Bore Sight a Scope in 6 Easy Ways Before the Range

In order to have accurate shot placement on your new rifle setup, you will need to sight it in. But this consists of two processes, the first would be bore sighting your rifle and the second would be to zero. Bore sighting before ever taking a shot is going to make the process not only quicker but will save you from making wasteful, and frustrated shots. Once your scope has been bore sighted, the next step to zero the optic is much easier.
So what exactly is bore sighting?
Bore sighting means that the shooter is able to remove the bolt or bolt carrier group to look down the bore to the target and adjust the gun to aim approximately center while also being able to adjust the scope to the same. The goal of bore sighting is to get first shots on paper, that way you know where the initial point of impact is and can then adjust in towards zero. Zeroing your optic is the follow up process that is used to fine tune after bore sighting, which ensures that the point of aim is the point of impact at the zeroed distance.
Bore sighting can be used anytime the optic is switched out, you have a new rifle, or something seems wildly off about your point of impact.
Can all rifles be sighted using this method?
Using the traditional method of actually looking down the bore means the firearm has to be built in such a way that this is possible. Bolt action guns and even AR’s can be traditionally bore sighted, however something like a lever action or AK would use an aid to accomplish the same goal.
Getting Setup to Boresight
While you of course need the unloaded rifle and optic to get started, there are a few other things that will be needed. The first thing you need is a target, pick one with a very visible bullseye to aim at.
Next, you need to set that target at an appropriate distance. The distance you bore sight and ultimately zero at depends on what your use case is for the rifle but common distances are 25 yards, 50 yards, 100 yards, 200 yards, and 300 yards. Whichever distance you pick (100 yards is most popular), make sure that you understand the hold over and how that will change depending on distance to target.
A stable surface will also be needed, this could be a rest of some type, sandbags, a bipod, or even bags and backpacks.
Lastly, you will want to ensure you understand how your optic works, reference the user manual to make sure you know how to adjust the optic and what needs to be set up on it. There are several different types of optics you can mount on a rifle so while the overall process will be the same individual adjustments may be optic specific. The main setup task here is to remove any covers on turrets and lenses if needed and to have any tools necessary to adjust nearby.
It should also be noted that depending on space available to you, you can bore sight a rifle at home at a shorter 25 yards before having access to a long range. Just remember the rifle should be unloaded for the entire process.
How to Bore Sight a Rifle
Whether you choose to bore sight at home before the range or as soon as you get there it will save you time and ammo on the zeroing process.
The setup is nearly the same for all options below, ensure the firearm is unloaded, remove the bolt or bolt carrier group or insert the device and place the rifle in your chosen sturdy rest. The rifle should be oriented towards the target.
Look Through
Looking through the gun is the traditional bore sight method. The rifle should be in its rest and facing the target at your selected distance.
- Lower your head and look through the breach, down the bore adjusting the gun slightly in its rest until the bullseye of your target is centered in the bore’s field of view.
- Look through the scope, be sure not to move the rifle. Find the reticle and then begin to adjust the scope using the windage and elevation adjustments until the reticle is now centered on target.
- Check by looking through the bore that you did not move the rifle, if you did recenter it.
- Check the scope and make any adjustments needed to align to center again.
- Repeat steps 3 and 4 until they both match up. This should result in hits on paper so that the zeroing process can begin.
Mechanical Center
This is an option that gives a starting point when other boresighting options aren’t feasible. For this option just an unloaded firearm and the mounted optic is needed.
- Turn the windage turret as far as it can go in one direction, this is the starting point.
- Turn the windage turret all the way in the opposite direction, while counting how many turns/clicks it took.
- Divide that count in half and turn the windage back the direction it came.
- This gives the mechanical center of the optic for one adjustment.
- Repeat this process with the elevation turret.
Bore sighting with the use of an aid
Using a device of some type is another way to bore sight and ease the zeroing process. This oftentimes allows for an easier method to understand and use, especially for beginners.
Bore Sight Collimator
The collimator is a small device that is inserted into the muzzle and replicates a target. This replicated target can be seen through your optic and has a sighting grid displayed on it. To use one of these devices follow the steps below.
- Insert collimator into muzzle.
- Look through the optic and find the displayed reticle
- Adjust the windage and elevation turrets until the reticle matches the center crosshairs shown on the collimator target.
Laser Bore Sight Options
There are several options when using a laser to bore sight, one being a muzzle mounted device and the other an always on cartridge. However, our BlackbeardX training systems can also be switched to always on to accomplish the same task. Be sure to choose the right set up, including caliber, for your use case and keep the instructions handy. Now we can take a look in detail on how to use each laser based option.
Muzzle Mounted Laser
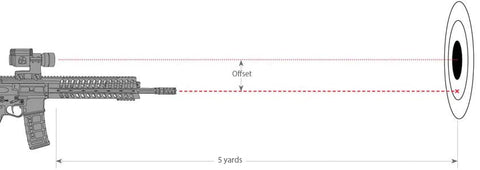
The muzzle mounted laser comes in a variety of forms but the idea is that you place the device in the muzzle end of the barrel so now you have a visual reference for where the barrel is pointed. Much like in traditional bore sighting, we are looking to see if the scope matches where the barrel is oriented and adjusting to bring them into alignment.
- Insert the boresight laser device into the muzzle of the barrel of the unloaded firearm. It should be emitting a laser.
- Place the firearm in the rest, oriented towards the bullseye of your target.
- Look through the optic and adjust the windage and elevation until the reticle aligns with the laser on the target.
- Remove the muzzle inserted device from the firearm.
Cartridge Laser Bore Sight
The cartridge version works much the same as the muzzle mounted, except rather than interesting the device in the muzzle end of the barrel we insert the cartridge into the chamber.
If you are not familiar with the term cartridge, know that it is what is most commonly referred to as a round. There are two types of laser cartridges as well, the first being the boresight laser we are referring to here for use in sighting in, while the second is a dry fire training aid which is activated upon trigger press to simulate a single shot.
Ensure you are using the cartridge style for your activity.
- Insert the laser cartridge into the chamber of the device.
- Carefully release the slide or bolt forward until it closes, a laser should be emitted out the end of the barrel.
- Place the firearm in the rest, oriented towards the bullseye of your target.
- Look through the optic and adjust the windage and elevation until the reticle aligns with the laser on the target.
- Remove the cartridge from the chamber of the firearm.
BlackbeardX as a Bore Sight
If you have one of our BlackbeardX units then you can use it to help you get on target, while bore sighting is not its main function it can be used as an aid. As a bonus feature each of our bolt carrier group replacement modules have a small switch on the side, which can be accessed through the ejection port with an open dust cover, to switch the laser to always on mode. This allows you to quickly bore sight the same way as a laser cartridge.
- Insert the bolt carrier group unit from BlackbeardX into the firearm and close it.
- Insert the magazine battery pack from BlackbeardX into the mag well.
- Using the small allen wrench included, locate the switch in the ejection port and switch it. A laser should now be emitting from the end of the barrel.
- Place the firearm in the rest, oriented towards the bullseye of your target.
- Look through the optic and adjust the windage and elevation until the reticle aligns with the laser on the target.
- Remove the bolt carrier group from the firearm OR practice using your BlackbeardX.
While you will still need to zero as normal, BlackbeardX can be used to save some time and ammo by switching easily between always-on laser bore sight and its normal shot indicating mode for each trigger press. While a laser cannot meet the ballistics of each round at every distance, it can give an approximation, especially at shorter distances, that can be used to learn holdovers, or check that the zero has stayed.


Kayla House
Author